Comprehensive Tutorial on django-htmx for People Who Hate JavaScript Builds
django-htmx lets your Django views send back small pieces of HTML and swap them into the page. You get live search, Load more buttons and inline forms without a JavaScript build. No npm, no bundler, no second codebase. You write Django views and Django templates, the same ones you already know.
This tutorial builds a searchable support-ticket table with a Load more button. Every line of code here ran on Django 6.1.1 and django-htmx 1.29.0, and the finished app passed a test in a real browser. It’s written for Django beginners and for developers who have used Django for years and never touched htmx.
Why I try to avoid a JavaScript build in my Django apps
I’ve used Django for more than seven years. I know JavaScript, and I’m still not a big fan of building apps around it. Before htmx, every interactive thing in my Django apps was a full page reload. Filter a table and the whole page came back.
The usual way out is a JavaScript frontend. That means a JavaScript build, the step where tools like Vite or Webpack bundle your frontend code into files a browser can run. I have four problems with it.
- The
node_modulesfolder and the npm updates that never stop. - Build config you have to debug before you can debug your app.
- Client-side state, which means the browser keeps its own copy of your data and you have to keep it in sync with the server.
- The same logic written twice, once in Python and once in JavaScript.
Want a table filter? Please install a toolchain first.
Tradion, my AI platform for financial research, has a React and Vite frontend, and I regret not using htmx there. The build and deploy steps hurt, and so did the learning curve of that stack for someone who lives in Django, APIs and devops.
On an internal dashboard, I tried django-htmx instead. It handled table filters and search, pagination, forms and modals, and stats that refresh on their own. All of it lives in Django views and templates, which is the part of the stack I already know. My take now is simple. I’d use it almost everywhere I build.
What is django-htmx?
htmx is a small JavaScript file you add to a page. You put attributes like hx-get on your HTML tags, and when the user does something, htmx asks your server for HTML and drops it into the page. The htmx docs describe it as a library that “allows you to access modern browser features directly from HTML, rather than using javascript.”
You’ll hear that htmx means no JavaScript at all. It doesn’t. htmx is a JavaScript file, and someone else wrote it. That’s the whole trick.
Your server doesn’t send JSON back. It sends a fragment, which is a small piece of HTML like a few table rows. htmx swaps that fragment into the page, and the rest of the page never reloads. Django already knows how to render HTML, so most of what you need is already in your head.
That also means an htmx page needs a server that answers with HTML. If you read that you can host an htmx app on any static host, that doesn’t hold for this setup, because Django has to run somewhere.
django-htmx is a separate package that makes htmx pleasant inside Django. It adds three things worth knowing about.
- Middleware, which is code that runs on every request before your view. It checks for the
HX-Requestheader that htmx sends and gives yourequest.htmx, which is true for htmx requests. It also exposes details about the request, like the target element. - The
{% htmx_script %}tag, which loads a copy of htmx from your own static files, so there’s no CDN link to maintain. - A debug helper. While
DEBUGisTrue, a small script shows Django’s error page when an htmx request fails with a 400, 403, 404 or 500.
You don’t need the package to use htmx with Django. Without it you’d check the HX-Request header yourself, and the package just saves you the typing.
One version note. django-htmx 1.29.0 serves htmx 2 by default. htmx 4 came out on August 28, 2026, and the package lets you opt in with version=4, though its docs still call that a beta. This tutorial uses the default, and it flags the one place where version 4 changes your code.
What will you build with django-htmx?
A small support-ticket dashboard with 63 made-up tickets. You get live search that filters as you type, and a Load more button that adds ten rows at a time. The page never reloads, and you write no JavaScript.
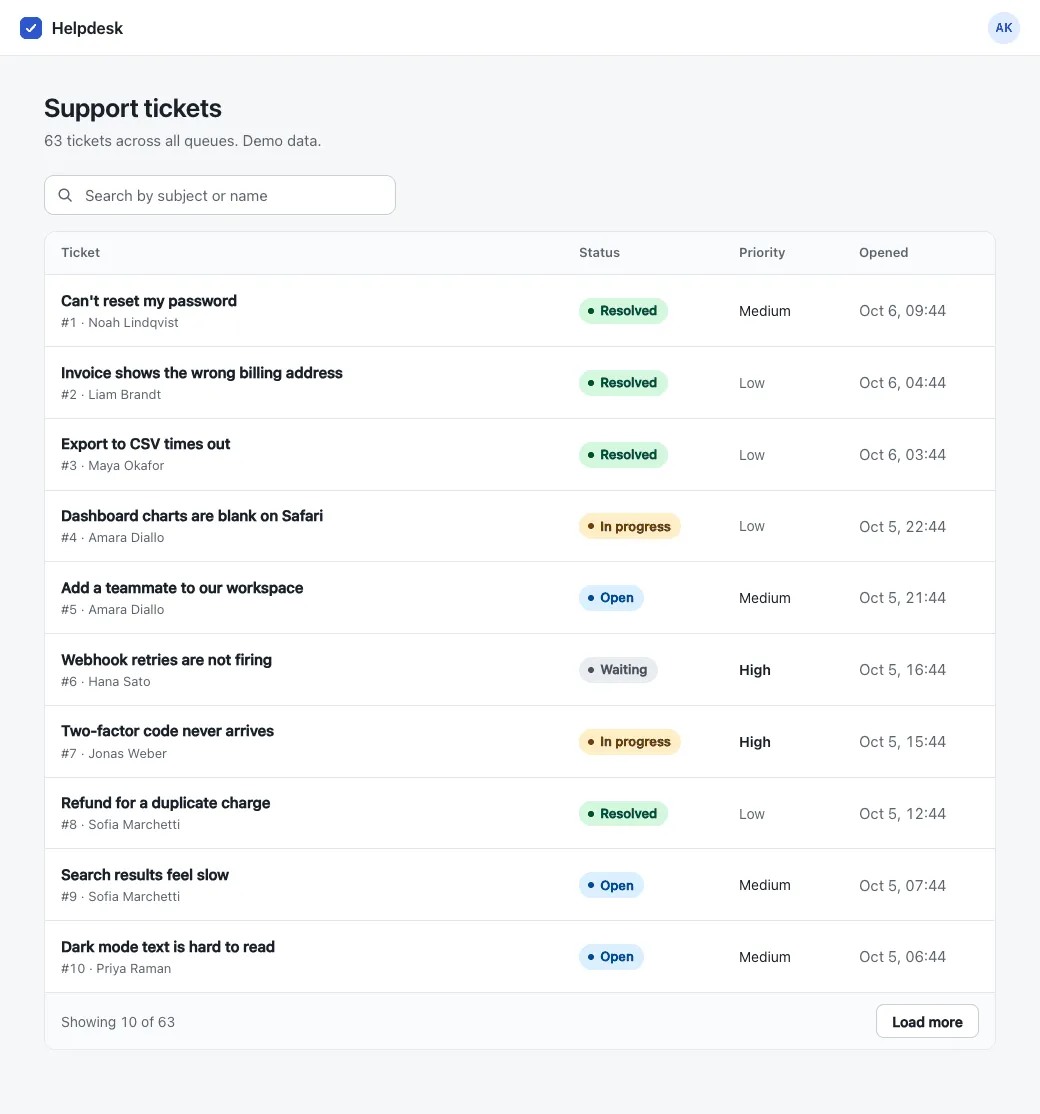
The finished demo. Every ticket and name is made-up demo data.
Here’s what happens each time you pause while typing in the search box.
You need Python 3.12 or newer, because Django 6.1 requires it, plus basic Django knowledge. Django 6.0 and later ship template partials, which this tutorial uses below. On Django 5.2, which django-htmx also supports, the django-template-partials package should give you the same tags, but only Django 6.1.1 was tested.
Step 1. Install django-htmx and add it to your project
Make a folder, then create a virtual environment, install the two packages, and start a project and an app. A virtual environment is an isolated copy of Python for one project, so packages from different projects don’t clash. On Windows, activate it with .venv\Scripts\activate instead.
python -m venv .venv
source .venv/bin/activate
python -m pip install django django-htmx
django-admin startproject config .
python manage.py startapp tickets
Open config/settings.py and add two entries to INSTALLED_APPS. One is the package, and one is your new app.
    'django.contrib.staticfiles',
    'django_htmx',
    'tickets',
]
Then add the middleware at the end of the MIDDLEWARE list.
    'django.middleware.clickjacking.XFrameOptionsMiddleware',
    'django_htmx.middleware.HtmxMiddleware',
]
Step 2. Create the Ticket model and some fake data
Each ticket has a subject, a requester, a status, a priority and an opened time. TextChoices is Django’s way to give a field a fixed list of allowed values, each with a readable label. Put this in tickets/models.py.
from django.db import models


class Ticket(models.Model):
    class Status(models.TextChoices):
        OPEN = "open", "Open"
        IN_PROGRESS = "in_progress", "In progress"
        WAITING = "waiting", "Waiting"
        RESOLVED = "resolved", "Resolved"

    class Priority(models.TextChoices):
        LOW = "low", "Low"
        MEDIUM = "medium", "Medium"
        HIGH = "high", "High"

    subject = models.CharField(max_length=120)
    requester = models.CharField(max_length=60)
    status = models.CharField(max_length=20, choices=Status, default=Status.OPEN)
    priority = models.CharField(max_length=10, choices=Priority, default=Priority.MEDIUM)
    opened = models.DateTimeField()

    class Meta:
        ordering = ["-opened", "-id"]

    def __str__(self):
        return self.subject
Create the table in the database. If makemigrations and migrate are new to you, my Django migrations tutorial explains both with a real store.
python manage.py makemigrations tickets
python manage.py migrate
Now for the data. A management command is a script you run with manage.py. This one wipes the table and creates 63 fake tickets, and it uses a seeded random generator, so you get the same data every time. Create empty __init__.py files in tickets/management/ and tickets/management/commands/, then add this as tickets/management/commands/seed_tickets.py.
import random
from datetime import timedelta

from django.core.management.base import BaseCommand
from django.utils import timezone

from tickets.models import Ticket

SUBJECTS = [
    "Can't reset my password",
    "Invoice shows the wrong billing address",
    "Export to CSV times out",
    "Dashboard charts are blank on Safari",
    "Add a teammate to our workspace",
    "Webhook retries are not firing",
    "Two-factor code never arrives",
    "Refund for a duplicate charge",
    "Search results feel slow",
    "Dark mode text is hard to read",
    "API returns 500 on large uploads",
    "Change the owner of an account",
    "Cancel my subscription",
    "Mobile app crashes on launch",
    "Email notifications arrive twice",
    "Need a receipt for last quarter",
    "SSO login loops back to the sign-in page",
    "Import skipped half of my rows",
    "Timezone is off by one hour",
    "Please delete my data",
]

REQUESTERS = [
    "Maya Okafor", "Liam Brandt", "Priya Raman", "Tomás Herrera", "Chloe Durand",
    "Noah Lindqvist", "Amara Diallo", "Ethan Park", "Sofia Marchetti", "Jonas Weber",
    "Hana Sato", "Marcus Bell", "Isla Romero", "Kofi Mensah", "Elena Petrova",
]


class Command(BaseCommand):
    help = "Create 63 fake support tickets (demo data)."

    def handle(self, *args, **options):
        Ticket.objects.all().delete()
        rng = random.Random(7)
        now = timezone.now()
        tickets = []
        for i in range(63):
            tickets.append(
                Ticket(
                    subject=SUBJECTS[i % len(SUBJECTS)],
                    requester=rng.choice(REQUESTERS),
                    status=rng.choices(
                        ["open", "in_progress", "waiting", "resolved"], weights=[4, 3, 2, 5]
                    )[0],
                    priority=rng.choices(["low", "medium", "high"], weights=[3, 5, 2])[0],
                    opened=now - timedelta(hours=3 * i + rng.randint(0, 2)),
                )
            )
        Ticket.objects.bulk_create(tickets)
        self.stdout.write(f"Created {len(tickets)} tickets.")
Run it with python manage.py seed_tickets. You should see Created 63 tickets.
Step 3. Write one view that returns a page or a fragment
This view is where django-htmx earns its keep. Put it in tickets/views.py.
from django.core.paginator import Paginator
from django.db.models import Q
from django.shortcuts import render
from django.views.decorators.vary import vary_on_headers

from .models import Ticket


@vary_on_headers("HX-Request")
def ticket_list(request):
    query = request.GET.get("q", "").strip()
    tickets = Ticket.objects.all()
    if query:
        tickets = tickets.filter(Q(subject__icontains=query) | Q(requester__icontains=query))

    page = Paginator(tickets, 10).get_page(request.GET.get("page"))
    context = {"page": page, "query": query, "total": Ticket.objects.count()}

    template = "tickets/index.html"
    if request.htmx:
        template += "#results"
    return render(request, template, context)
The search filters on subject or requester, and Q lets Django combine those two conditions with OR. Paginator splits the tickets into pages of ten, and get_page hands back a safe page even if someone types a silly page number.
The last four lines are the htmx part. request.htmx is true when htmx made the request. In that case the view adds #results to the template name, and Django renders only the named piece of the template called results. Every other request gets the full page.
vary_on_headers tells caches that this URL returns different things depending on the HX-Request header. The django-htmx docs say to add it for views that switch content with request.htmx if you set caching headers. My demo doesn’t cache anything, so this is a seatbelt, and the response does carry Vary: HX-Request.
Wire the view up to URLs. First tickets/urls.py, then config/urls.py.
from django.urls import path

from . import views

urlpatterns = [
    path("", views.ticket_list, name="ticket_list"),
]
from django.contrib import admin
from django.urls import include, path
urlpatterns = [
path("admin/", admin.site.urls),
path("", include("tickets.urls")),
]Step 4. Load htmx in a base template
Create tickets/templates/tickets/base.html. It’s the page shell, and it’s where htmx gets loaded.
{% load static django_htmx %}
<!doctype html>
<html lang="en">
<head>
  <meta charset="utf-8">
  <meta name="viewport" content="width=device-width, initial-scale=1">
  <title>Support tickets</title>
  <link rel="icon" href="{% static 'tickets/favicon.svg' %}">
  <link rel="stylesheet" href="{% static 'tickets/app.css' %}">
  {% htmx_script %}
</head>
<body hx-headers='{"x-csrftoken": "{{ csrf_token }}"}'>
  <header class="topbar">
    <a class="brand" href="/">
      <svg width="22" height="22" viewBox="0 0 22 22" aria-hidden="true">
        <rect width="22" height="22" rx="6" fill="currentColor"/>
        <path d="M6.5 11.5l3 3 6-7" fill="none" stroke="#fff" stroke-width="2" stroke-linecap="round" stroke-linejoin="round"/>
      </svg>
      Helpdesk
    </a>
    <span class="avatar" title="Demo user">AK</span>
  </header>
  <main>
    {% block content %}{% endblock %}
  </main>
</body>
</html>
{% load django_htmx %} and {% htmx_script %} add htmx from your own static files. The hx-headers attribute on <body> makes every htmx request send Django’s CSRF token. A CSRF token is a secret Django puts in your pages so it can tell a request came from your own site and not from another site tricking the browser.
Use the {{ csrf_token }} variable there, not the {% csrf_token %} tag, which is what the django-htmx docs recommend. My demo only reads data, so it never sends a POST. The header is there anyway, because the first form you add will need it. The gotchas section shows what happens without it.
Step 5. Add live search with hx-trigger
Create tickets/templates/tickets/index.html. I’ll show it in two parts, and the top part is the search box.
    <input
      type="search" name="q" value="{{ query }}" autocomplete="off"
      placeholder="Search by subject or name"
      hx-get="{% url 'ticket_list' %}"
      hx-trigger="input changed delay:300ms"
      hx-target="#rows"
      hx-indicator="#searching">
    <span id="searching" class="spinner htmx-indicator" aria-hidden="true"></span>
Each hx- attribute does one job.
hx-getsends a GET request to a URL when the trigger fires. Here that’s the same view from Step 3.hx-trigger="input changed delay:300ms"sets the trigger.inputfires every time the text changes,changedskips the request if the value didn’t actually change, anddelay:300mswaits until you pause for 300 milliseconds. Typingmayaquickly sends one request, not four.hx-target="#rows"says where the response goes. The default swap puts it inside the target, so the new rows replace the old ones inside the table body.hx-indicator="#searching"points at the spinner next to the box. htmx adds a class while the request runs, and the CSS fades the spinner in. The spinner stays visible while a slow response is on its way.name="q"is how the server finds the text. htmx sends the box’s value as?q=maya.
Step 6. Add a Load more button with hx-swap
The second part of index.html is the table. Everything between partialdef and endpartialdef is the named piece Django renders for htmx requests.
    <tbody id="rows" aria-live="polite">
      {% partialdef results inline %}
        {% for ticket in page %}
          <tr>
            <td>
              <div class="subject">{{ ticket.subject }}</div>
              <div class="meta">#{{ ticket.id }} · {{ ticket.requester }}</div>
            </td>
            <td><span class="pill pill-{{ ticket.status }}">{{ ticket.get_status_display }}</span></td>
            <td class="priority priority-{{ ticket.priority }}">{{ ticket.get_priority_display }}</td>
            <td class="opened">{{ ticket.opened|date:"M j, H:i" }}</td>
          </tr>
        {% empty %}
          <tr>
            <td class="empty" colspan="4">
              <svg width="28" height="28" viewBox="0 0 16 16" aria-hidden="true">
                <circle cx="7" cy="7" r="4.75" fill="none" stroke="currentColor" stroke-width="1.25"/>
                <path d="M10.5 10.5L14 14" stroke="currentColor" stroke-width="1.25" stroke-linecap="round"/>
              </svg>
              <p class="empty-title">No tickets match “{{ query }}”</p>
              <p>Check the spelling or try a shorter search.</p>
            </td>
          </tr>
        {% endfor %}
        {% if page.paginator.count %}
          <tr class="footer">
            <td colspan="4">
              <div class="footer-inner">
                <span>Showing {{ page.end_index }} of {{ page.paginator.count }}</span>
                {% if page.has_next %}
                  <button
                    class="more"
                    hx-get="{% url 'ticket_list' %}?q={{ query|urlencode }}&page={{ page.next_page_number }}"
                    hx-target="closest tr"
                    hx-swap="outerHTML">
                    Load more
                    <span class="spinner" aria-hidden="true"></span>
                  </button>
                {% endif %}
              </div>
            </td>
          </tr>
        {% endif %}
      {% endpartialdef %}
    </tbody>
{% partialdef results inline %} defines a partial named results. The inline word makes Django render it in place too, so the first full-page load shows the rows as well. Django’s template partials docs cover the syntax.
The footer row lives inside the partial on purpose. That keeps the count right after every search and every Load more. The button only shows while there’s a next page.
The Load more button has three attributes. hx-get asks for the next page, and it carries the search text, so Load more respects your filter. A search that matches 33 tickets still filters after Load more, and every loaded row matches.
hx-target="closest tr" points at the table row that holds the button. hx-swap="outerHTML" replaces that whole row, not just what’s inside it. The response is the next ten rows plus a fresh footer row, so the old footer disappears and the new one holds the next button.
Step 7. Make it look like a real dashboard
None of this step is htmx, so skip it if you like. The look comes from one plain CSS file and a one-line icon, with system fonts and no build step. Save the icon as tickets/static/tickets/favicon.svg.
<svg xmlns="http://www.w3.org/2000/svg" viewBox="0 0 22 22"><rect width="22" height="22" rx="6" fill="#4a46d4"/><path d="M6.5 11.5l3 3 6-7" fill="none" stroke="white" stroke-width="2" stroke-linecap="round" stroke-linejoin="round"/></svg>Then save this as tickets/static/tickets/app.css.
:root {
  color-scheme: light;
  --bg: oklch(97.5% 0.004 255);
  --surface: oklch(100% 0 0);
  --surface-sunk: oklch(98.4% 0.004 255);
  --ink: oklch(24% 0.02 260);
  --muted: oklch(50% 0.02 260);
  --line: oklch(92.5% 0.006 260);
  --line-strong: oklch(85% 0.01 260);
  --accent: oklch(50% 0.19 265);
  --accent-wash: oklch(94% 0.04 265);

  --open-bg: oklch(94.5% 0.04 255);
  --open-ink: oklch(42% 0.15 255);
  --progress-bg: oklch(95.5% 0.055 85);
  --progress-ink: oklch(40% 0.1 65);
  --waiting-bg: oklch(94.5% 0.008 260);
  --waiting-ink: oklch(44% 0.02 260);
  --resolved-bg: oklch(94.5% 0.05 155);
  --resolved-ink: oklch(38% 0.1 155);

  --font: ui-sans-serif, system-ui, -apple-system, "Segoe UI", Roboto, sans-serif;
  --ease-out: cubic-bezier(0.16, 1, 0.3, 1);
}

*, *::before, *::after { box-sizing: border-box; }

html { -webkit-text-size-adjust: 100%; }

body {
  margin: 0;
  background: var(--bg);
  color: var(--ink);
  font: 15px/1.5 var(--font);
  font-variant-numeric: tabular-nums;
  caret-color: var(--accent);
  -webkit-font-smoothing: antialiased;
}

::selection { background: var(--accent-wash); color: var(--ink); }

:focus-visible { outline: 2px solid var(--accent); outline-offset: 2px; }

.sr-only {
  position: absolute; width: 1px; height: 1px; margin: -1px; padding: 0;
  overflow: hidden; clip-path: inset(50%); white-space: nowrap; border: 0;
}

/* Top bar */
.topbar {
  display: flex; align-items: center; justify-content: space-between;
  height: 56px; padding: 0 1.25rem;
  background: var(--surface); border-bottom: 1px solid var(--line);
}
.brand {
  display: inline-flex; align-items: center; gap: 0.6rem;
  color: var(--ink); text-decoration: none;
  font-weight: 650; font-size: 1rem; letter-spacing: -0.01em;
}
.brand svg { color: var(--accent); }
.avatar {
  display: grid; place-items: center; width: 32px; height: 32px;
  border-radius: 50%; background: var(--accent-wash); color: var(--accent);
  font-size: 0.75rem; font-weight: 650; letter-spacing: 0.02em;
}

/* Page */
main { max-width: 62rem; margin: 0 auto; padding: 2.25rem 1.25rem 4rem; }

.page-head h1 {
  margin: 0; font-size: 1.625rem; line-height: 1.2; font-weight: 650;
  letter-spacing: -0.015em; text-wrap: balance;
}
.page-head p { margin: 0.35rem 0 0; color: var(--muted); font-size: 0.9375rem; }

.toolbar { margin: 1.5rem 0 1rem; }

/* Search */
.search { position: relative; display: block; width: min(100%, 22rem); color: var(--muted); }
.search > svg { position: absolute; left: 0.8rem; top: 50%; translate: 0 -50%; pointer-events: none; }
.search input {
  width: 100%; height: 40px; padding: 0 2.5rem 0 2.5rem;
  background: var(--surface); color: var(--ink);
  border: 1px solid var(--line-strong); border-radius: 10px;
  font: inherit; transition: border-color 0.15s;
}
.search input::placeholder { color: var(--muted); opacity: 1; }
.search input:hover { border-color: oklch(76% 0.015 260); }
.search input:focus-visible { border-color: var(--accent); outline-offset: 0; }
.search input::-webkit-search-cancel-button { cursor: pointer; margin-right: -0.25rem; }
.search .spinner { position: absolute; right: 2.4rem; top: 50%; translate: 0 -50%; }

/* Spinner and htmx indicator states */
.spinner {
  width: 14px; height: 14px; border-radius: 50%;
  border: 2px solid var(--line-strong); border-top-color: var(--accent);
  animation: spin 0.7s linear infinite;
}
.htmx-indicator { opacity: 0; transition: opacity 0.15s; }
.htmx-request .htmx-indicator, .htmx-request.htmx-indicator { opacity: 1; }
@keyframes spin { to { rotate: 360deg; } }

/* Table */
.panel {
  background: var(--surface); border: 1px solid var(--line);
  border-radius: 12px; overflow: hidden;
}
table { width: 100%; border-collapse: collapse; table-layout: fixed; }
th:nth-child(2) { width: 10rem; }
th:nth-child(3) { width: 7.5rem; }
th:nth-child(4) { width: 9.5rem; }
th {
  padding: 0.7rem 1rem; text-align: left;
  background: var(--surface-sunk); border-bottom: 1px solid var(--line);
  color: var(--muted); font-size: 0.8125rem; font-weight: 600;
}
td { padding: 0.85rem 1rem; border-bottom: 1px solid var(--line); vertical-align: middle; }
tbody tr:last-child td { border-bottom: 0; }
tbody tr:not(.footer):hover td { background: var(--surface-sunk); }

.subject { font-weight: 560; }
.meta { margin-top: 0.1rem; color: var(--muted); font-size: 0.8125rem; }
.opened { color: var(--muted); white-space: nowrap; }
.priority { font-size: 0.875rem; }
.priority-high { font-weight: 650; }
.priority-low { color: var(--muted); }

/* Status pills */
.pill {
  display: inline-flex; align-items: center; gap: 0.4rem;
  padding: 0.2rem 0.65rem 0.2rem 0.55rem; border-radius: 999px;
  font-size: 0.8125rem; font-weight: 560; white-space: nowrap;
}
.pill::before { content: ""; width: 6px; height: 6px; border-radius: 50%; background: currentColor; }
.pill-open { background: var(--open-bg); color: var(--open-ink); }
.pill-in_progress { background: var(--progress-bg); color: var(--progress-ink); }
.pill-waiting { background: var(--waiting-bg); color: var(--waiting-ink); }
.pill-resolved { background: var(--resolved-bg); color: var(--resolved-ink); }

/* Footer row with count and Load more */
.footer td { background: var(--surface-sunk); border-top: 1px solid var(--line); border-bottom: 0; padding: 0.7rem 1rem; }
.footer-inner {
  display: flex; align-items: center; justify-content: space-between; gap: 1rem;
  color: var(--muted); font-size: 0.875rem;
}
.more {
  display: inline-flex; align-items: center; gap: 0.5rem;
  height: 34px; padding: 0 0.95rem;
  background: var(--surface); color: var(--ink);
  border: 1px solid var(--line-strong); border-radius: 8px;
  font: inherit; font-size: 0.875rem; font-weight: 560; cursor: pointer;
  transition: background-color 0.15s, border-color 0.15s;
}
.more:hover { background: var(--bg); border-color: oklch(76% 0.015 260); }
.more:active { background: var(--line); }
.more .spinner { display: none; }
.more.htmx-request { color: var(--muted); cursor: progress; }
.more.htmx-request .spinner { display: block; }

/* Empty state */
.empty { padding: 3.5rem 1rem; text-align: center; color: var(--muted); }
.empty svg { color: var(--line-strong); }
.empty p { margin: 0.25rem 0 0; font-size: 0.9375rem; }
.empty .empty-title { margin-top: 0.75rem; color: var(--ink); font-weight: 600; }

/* New rows rise in once */
tbody tr { animation: row-in 0.34s var(--ease-out) backwards; }
tbody tr:nth-child(10n+2) { animation-delay: 25ms; }
tbody tr:nth-child(10n+3) { animation-delay: 50ms; }
tbody tr:nth-child(10n+4) { animation-delay: 75ms; }
tbody tr:nth-child(10n+5) { animation-delay: 100ms; }
tbody tr:nth-child(10n+6) { animation-delay: 125ms; }
tbody tr:nth-child(10n+7) { animation-delay: 150ms; }
tbody tr:nth-child(10n+8) { animation-delay: 175ms; }
tbody tr:nth-child(10n+9) { animation-delay: 200ms; }
tbody tr:nth-child(10n+10) { animation-delay: 225ms; }
@keyframes row-in { from { opacity: 0; translate: 0 6px; } }

@media (max-width: 40rem) {
  main { padding-top: 1.5rem; }
  th:nth-child(3), td:nth-child(3), th:nth-child(4), td:nth-child(4) { display: none; }
  th:nth-child(2) { width: 8.75rem; }
  .footer td { display: table-cell; }
}

@media (prefers-reduced-motion: reduce) {
  *, *::before, *::after { animation: none !important; transition: none !important; }
}
Step 8. Run it and test it
Start the server and open http://127.0.0.1:8000/.
python manage.py runserverTry three things. Type maya quickly. On the demo data that matches 6 tickets, and the footer says Showing 6 of 6.
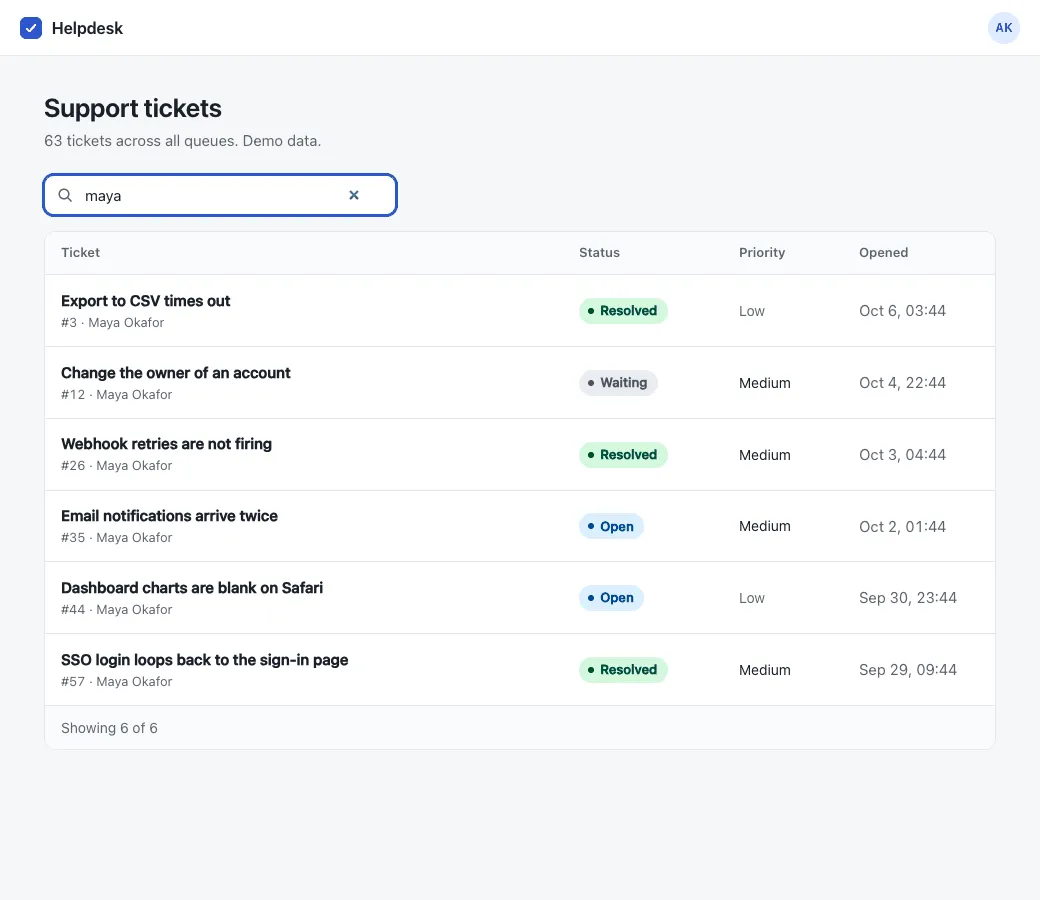
Search results for maya, with no page reload.
Clear the box, then click Load more. The table grows from 10 rows to 20, and the footer reads Showing 20 of 63. Six clicks reach the end, and the button disappears at Showing 63 of 63. Last, type zzzz to see the empty state.
To see what htmx actually asks for, request the page twice with curl. The second request adds the header htmx sends.
curl -s localhost:8000/ | grep -c '<html'
curl -s -H 'HX-Request: true' localhost:8000/ | grep -c '<html'
The first command prints 1, because you got a full page. The second prints 0, because you got a fragment. A browser test script that does all of this and counts the rows passes too.
Which htmx attributes did this tutorial use?
Here is every htmx attribute from the steps, in one place.
| Attribute | What it does | Step |
|---|---|---|
hx-get |
Sends a GET request | 5, 6 |
hx-trigger |
Starts the request | 5 |
hx-target |
Where the reply goes | 5, 6 |
hx-swap |
How the reply goes in | 6 |
hx-indicator |
Shows the spinner | 5 |
hx-headers |
Adds the CSRF token | 4 |
What are the common django-htmx gotchas?
The first one tripped me up. The rest come from the docs, and they’re easy to fix once you know them.
Why do htmx POST requests return 403 in Django?
My htmx POST requests came back as 403 Forbidden until I put the CSRF token in a header. A normal Django form carries the token in a hidden field. A request htmx sends from a plain button has no hidden field to carry it, so Django says no.
The fix is the hx-headers attribute on <body> from Step 4. Every htmx request now sends the token in the X-CSRFToken header, and Django accepts that. Curl confirms both sides, using the admin login page as the target. A POST with the cookie and no header got a 403 with the reason CSRF token missing. The same POST with the X-CSRFToken header got past the CSRF check.
Django was right to say no. It only felt rude.
If you move to htmx 4, write hx-headers:inherited instead, which is what the django-htmx docs say. Inheritance became opt-in there, and InfoQ’s write-up calls out that CSRF tokens passed through hx-headers silently stop working without that suffix. While you build, keep DEBUG = True. The django-htmx debug script then shows Django’s own error page when a request fails, instead of leaving you staring at a page that did nothing.
Full page or fragment?
Any view that serves both a full page and a fragment has to choose which one to send. request.htmx answers that, as the last four lines of the Step 3 view show. The docs list two ways to do it. One uses partials, which is what this tutorial does. The other passes a variable that picks which base template your page extends, a full one for normal requests and a bare one for htmx requests, so it needs no partials.
Two more are in the docs and aren’t part of this demo. If you set caching headers, add Vary: HX-Request, which vary_on_headers did for us. If you use hx-push-url, which updates the address bar, check request.htmx.history_restore_request. The docs say it’s true when htmx restores a page after a miss in its local history cache.
When would I not use django-htmx?
For me, almost nowhere. I’d use it on nearly everything I build, which is exactly why I regret the React and Vite frontend on Tradion.
Almost isn’t never, though. htmx’s own essay on when to use hypermedia is blunt about the exceptions. These come from their essay, not from my experience.
- UIs with many dynamic dependencies between parts, like a spreadsheet where users can type their own formulas into cells.
- Apps that need full functionality offline.
- UIs that update many times a second. The essay says that putting a network request between a mouse move and a UI update “will not work well.”
- Teams that want component kits built for React, such as ShadCN, because the essay says choosing htmx means you can’t use them.
A spreadsheet built on htmx is a cry for help.
The essay also lists where hypermedia fits well, and that covers most of what a business app is. Think text and images, CRUD forms, and pages made of independent blocks.
What should you build next with django-htmx?
Try one of these on the same project. Add a small form that changes a ticket’s status, which needs the CSRF header you already set. Open ticket details in a modal. Add a stats card that refreshes itself on a timer, since htmx can poll the server.
If Django itself is new to you, my Django vs. Flask comparison helps you decide if it’s the right framework. For more project ideas, a few of them built with Django, see my Python project ideas for beginners. If you want Django talking to an AI model, my guide to building an AI assistant with Django and the Anthropic SDK is the next stop.
Which page in your Django app still reloads everything for one small change, and would it survive becoming a fragment?